A Solid State Drive (SSD) offers a unique storage solution to enhance the memory capacity of your computer. These drives are specifically engineered to enable swift file access, resulting in significantly improved performance for your machine.
SSDs have the added advantages of consuming less power and providing faster load times for various applications, games, and movies. Consequently, many individuals are making the switch. With the increasing popularity, the importance of learning how to format SSD and reformatting also rises.
If you’re seeking guidance on how to wipe out an SSD for Windows and Mac, the following article covers various methods for you to try.
Why Do You Need to Format SSD?
SSD formatting serves various essential purposes:
1. Preparing a New SSD for Use: When you get a new drive, it typically arrives without any formatting. To make it usable, it is necessary to format a new SSD.
2. Resolving Performance Concerns: As time passes, your drive might encounter performance problems or slow down due to data fragmentation or file system errors. You can format SSD to address these issues, leading to the restoration of optimal performance.
3. Erasing Residual Data: SSD formatting involves erasing all the data on the drive, including any residual data that may remain after deleting files. This process ensures complete data privacy and minimizes the risk of potential data breaches.
4. Changing File System: Occasionally, it becomes necessary to switch the file system to ensure compatibility with a different operating system or enhance performance.
5. Preparing for a Fresh Installation: When planning to perform a fresh installation of the operating system, it is often recommended to format SSD. This action guarantees a clean slate and assists in eliminating any existing issues or conflicts.
Things To Consider Before Formatting An SSD
Learning how to format an SSD is a relatively simple task, but it’s crucial to be mindful of certain errors that could potentially degrade the drive’s performance.
Backup Your Data
If you intend to reformat an older SSD for use on a different computer, it’s important to create backups of any important files beforehand. Formatting a drive will erase its memory entirely, resulting in the permanent loss of any files not stored elsewhere.
Prior to initiating the process, diligently backup the desired files to a separate folder or an alternate storage device as a precaution.
Choose “Quick Format”
When it comes to SSDs, it is strongly recommended to exclusively utilize the quick format option. Conducting a full format on an SSD has the potential to significantly reduce its lifespan and overall performance. You can read about it in detail in one of the later sections of this article.
Maintain Performance by Enabling TRIM
To uphold optimal performance, it is advisable to enable TRIM, a sophisticated technological feature that ensures the SSD effectively manages data storage. TRIM aids in the elimination of unnecessary or obsolete saved files, optimizing the drive’s efficiency.
How to Format an SSD in Windows 10/11?
Understanding the key considerations to format SSD may appear relatively straightforward. Now let’s explore three simple and effective techniques that can assist you in this process:
Format a New SSD Using File Explorer
Among the various available methods, this particular approach stands out for its simplicity. Follow the following steps to learn how to wipe an SSD:
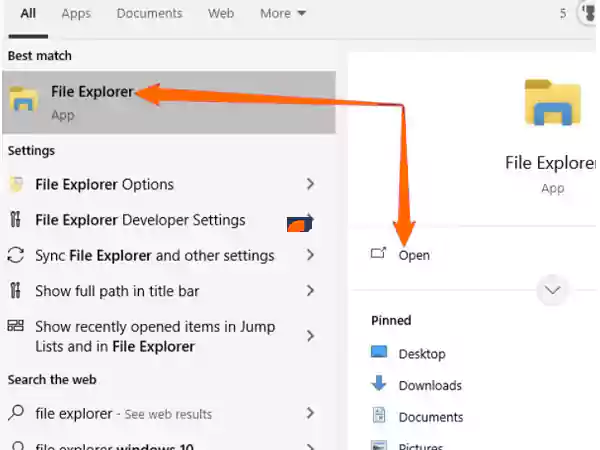
1. Start by searching for “file explorer” in the start menu and click on “open“.
2. Locate the “This PC” option on the left side and select it.
3. Upon accessing “This PC” you will discover a list of connected storage devices, be it internal or external. This includes SSDs, DVDs, USB drives, and even network devices. Choose the specific drive that needs formatting.

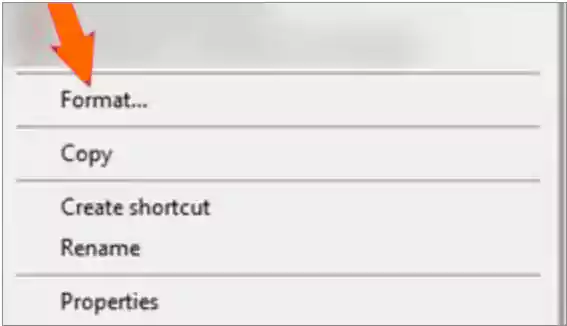
4. Now click on the “Format” option.
5. Afterward, a dialog box will emerge. Opt for the “Quick Format” setting prior to initiating the process, and you are done. Additionally, you can assign a name to your SSD utilizing the “Volume Label” function.

How to Format SSD for Windows using Disk Management?
If you need to format a disk partition, the Disk Management tool in Windows can be of great help. It facilitates various partition operations such as creation, formatting, deletion, extension, or shrinkage. Here is how to wipe out SSD data using this tool:
1. Type “Disk Management” in the search bar and select the tool.
2. Choose the SSD you wish to format and right-click on it. Then, select “Format“.
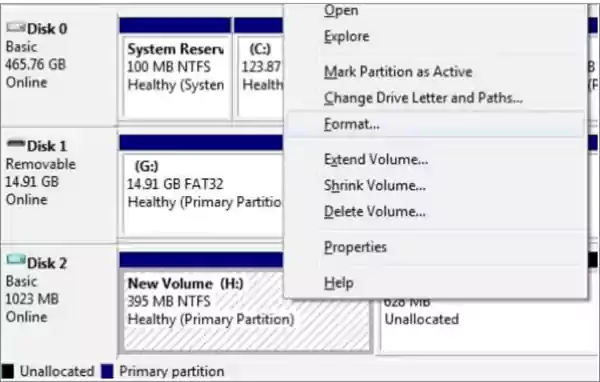
3. Opt for the desired file system and cluster size. Proceed by selecting the “Quick Format” option.
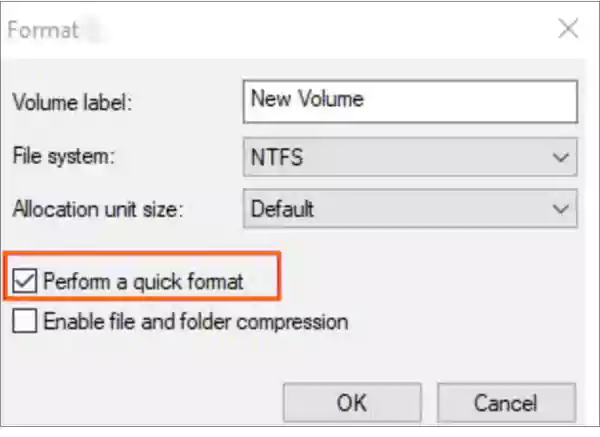
4. Finally, click “OK” to initiate the formatting process.
Format an SSD Using Command Prompt?
When it comes to formatting a drive, using the command prompt in Windows is an excellent choice. This versatile tool serves various purposes, including partition creation and deletion. Follow the steps below to use this method to format SSD:
1. Open the search box, type “command prompt” and right-click on the result. Choose “Run as Administrator” to proceed.
2. A black window will appear. Type “Diskpart” and press enter. Subsequently, enter the following command lines one by one, pressing enter after each line:
- list disk
- select disk A
- clean
- create partition primary
- format fs=ntfs quick
- assign

Finally, you are done with formatting your drive using the command prompt.
How to Format an SSD in macOS?
To format SSD drives on macOS, you can utilize the Disk Utility application. In case you possess a new internal SSD or a drive that hasn’t been explicitly formatted for macOS, it is essential to go through the procedure.
To format a new SSD on macOS, follow these steps:
1. Install your newly acquired internal drive or connect the external SSD to your Mac using a USB connection.
2. Locate and open the Disk Utility application. You can either utilize the Spotlight search feature or navigate to Applications > Utilities > Disk Utility.
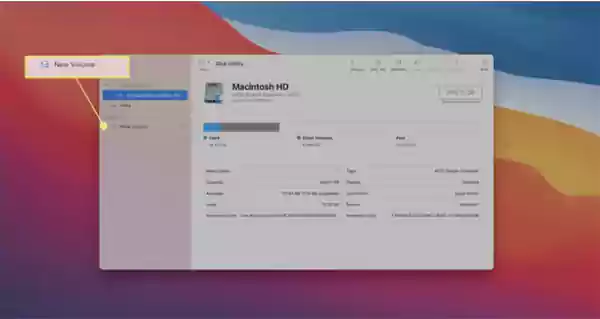
3. Once the Disk Utility interface is open, locate and select the SSD that you wish to format.
4. Next, provide a name for the drive that you are formatting.
5. Next, you need to choose a file system for the drive. If you are uncertain about the selection, consider using one of the following options based on your specific requirements:
- AFPS: Opt for this file system if you own a Mac manufactured after 2017 and do not intend to share the drive with a Windows machine.
- Mac OS Extended (Journaled): Select this file system if you have a Mac manufactured before 2017 and do not plan on sharing the drive with a Windows machine.
- exFAT: If you need to share the drive with a Windows machine, choose this file system.

6. After deciding on the appropriate file system, click on the “Erase” button to initiate the formatting process.
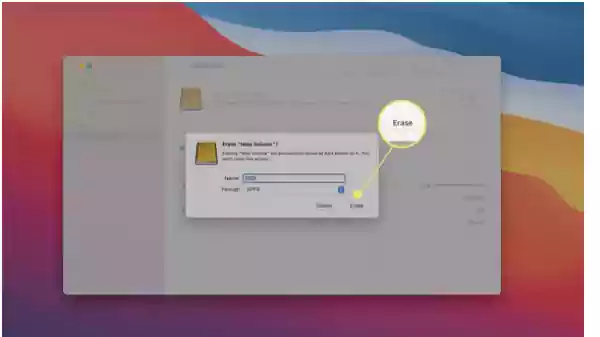
7. Wait patiently for the process to complete, and once it is finished, click on “Done” to finalize the procedure.
Why Should You Avoid Full Format?
Earlier, it was essential to utilize the full format feature to ensure the complete eradication of data from your hard drive. This method is particularly applicable to traditional hard drives. The complete format procedure involves overwriting every nook and cranny of the hard drive with zeros, effectively eliminating all content.
While not foolproof, as a dedicated team could potentially recover fragments of data, it does provide ample protection against the average individual who might stumble upon your discarded hard drive.
In contrast, contemporary solid-state drives store data using a completely different physical mechanism, despite still relying on the binary representation of ones and zeros. While hard drives rely on magnetic platters, solid-state drives use specialized “cells” that are either charged or discharged, representing a 0 or 1 accordingly.
Nevertheless, solid-state storage comes with a drawback; each cell has a limited number of write cycles before it becomes unusable. A modern SSD can endure the daily influx of several hundred gigabytes of data for years before facing failure. However, it is advisable to minimize unnecessary write operations on SSDs, which is why using the full format option is discouraged.
Conclusion
SSD formatting is a simple procedure that is required for removing existing data, enhancing performance, and resolving any problems. Whether you prefer utilizing Windows Disk Management or the Command Prompt, adhering to the instructions provided in this article will assist you to learn how to wipe out SSD data efficiently.
It is crucial to remember to create a backup of your data prior to formatting to prevent any potential loss. By correctly formatting your SSD, you can experience enhanced performance and dependability, leading to an improved experience.
Frequently Asked Questions (FAQs)
Ans: If you possess a Windows operating system (OS) installed on your solid-state drive, initiating an SSD formatting procedure will delete all the data on the disk, including the OS. Nevertheless, when you try to format an SSD where your computer’s OS is presently active, you will encounter an error message that informs you about the same.
Ans: The method of formatting an SSD remains consistent across various Windows versions, including 7, 8, and 10. Start by launching Disk Management, then right-click on the SSD and select the Format option. Proceed with the instructions that appear on the screen to finally format SSD.
Ans: If you are concerned about potential data fragments remaining even after you format SSD, you might have the possibility to perform secure formatting from the BIOS. However, it’s important to note that this option is not commonly available and is typically found on less mainstream motherboards or specialized gaming machines.
If your computer supports this feature, you should access the BIOS or UEFI settings, select your drive, locate the Secure Erase option and follow the prompts.
Ans: Although it is possible to recover data from a failed drive, the success of data recovery relies on the condition of the SSD. Additionally, if the TRIM command is enabled, the drive will automatically manage data recovery and destruction.
Sources:
- Solid State Drive, By Wikipedia
- Formatting a Samsung SSD, By Samsung Support How to format a new SSD and make it bootable?, By Microsoft Learn

